Car problems often increase with years of use, and worn parts must also be replaced. Because of this, drivers almost always turn to the usually arduous and often expensive journey to a specialist workshop. Only they have the necessary diagnostic equipment, tools, and trained personnel to get the broken car back on track.
On the other hand, it’s not always like this. Simple failures require a very simple job that will not require professional skills or expensive equipment. Brakes, exhaust, tires: these are classic problems in the car. Even modern, new cars sometimes consist of simple mechanical elements that can be repaired or replaced by laypeople. You can still do a few things on your own without having to go to a workshop.
Is it really necessary to pay for the cost of the workshop?

Of course not. Think about what you can do with the car yourself.
We know that alternator, starter, and various bearings and driveshafts create common problems for many older cars. It is true that the parts do not cost that much, but the hours of repair in the workshop also cost a lot of money. You need to have basic knowledge of cars to do the job yourself, and if you have the expertise and skills you can do almost anything yourself.
We know that repairs to modern cars are usually complex because of their complex technology. However, you don’t have to go to the workshop for every little thing. There are more reliable manufacturers like Toyota and Honda, but everything has its own shelf life. We will suggest 7 failures that you can repair on your own car.
Change wheels

In the fall or spring: summer tires should be replaced for winter and half a year later the reverse process. If you want to do this with a car mechanic, you are waiting for your appointment forever or waiting in line in front of the workshop in case you did not arrive on time. Not to mention the cost… A tire change is done quickly, and repetitive action every few months gives you a routine in case of a breakdown where you have to change the wheel on the road.
If you do not want to get down on the tire repair kits, you should fit a crane and wheel nut (ideally a solid wheel holder) into the vehicle tool kit.
After attaching the car with the parking brake and switching on the first gear (or “P” position) before unrolling, gently loosen the wheel bolts (ideally by crossing) if the car is still on the ground. Then slide the crane under the corresponding container on the car door sill, which is marked externally and is usually in the front or behind the wheel arches. Pull the creeper out so that the wheel is in the air. Now completely remove the screws by unscrewing.
With all the screws removed, carefully lift the wheel off the hub. Assemble the new wheel in reverse order and twist the wheel bolts – starting from the top – by crossing them.
Tip: Remember to tighten the bolts after 50 to 100 kilometers. Ideally with a torque wrench, because if they are too strong, they may not turn out next time.
Change light bulbs

How it works differs from car to car and is described in the manual. Sometimes it is enough to just remove the faulty bulb from the socket and replace it with a new one. For other models, the headlamps must be removed, which usually has the advantage that everything is clearly visible and nothing needs to be lit.
In some cases, the path to the lamp leads through the wheelhouse. But that usually seems more complicated than it actually is. But caution is always advised: individual parts are often very brittle and sharp edges increase the risk of cutting. It is best to use gloves or a changing cloth so as not to accidentally contaminate the lamp.
Change wipers

When was the last time you changed your wipers? Shall we do it now? Who has not yet answered “yes” to the question of a service consultant during the inspection negotiations and later became nervous when he looked into the bill that he had paid several times how much the new wiper blades cost in the accessories store. These are among the last parts of the car that anyone can replace.
For most wiper models, four steps are sufficient: open the lever, pull out the old wiper blade, insert a new one, and close the lever again. It should be ensured that the new wiper is firmly in the anchorage and that it lies flat on the window. If you feel unsafe as parts rarely need to be replaced, simply follow the instructions on the package of high-quality wipers. Also, you can find used Honda spares, in excellent condition, in places such as usedhondaparts.co.za
Change air filter
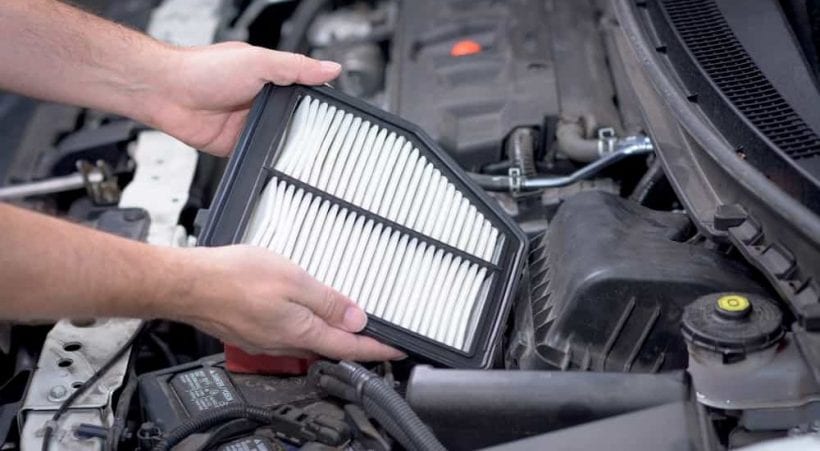
To get the air filter, look for the black plastic box in the engine compartment from which the colon comes out. If in doubt, check the manual where the part is in your car. The case cover is usually secured with retaining clips – sometimes with only a few screws – which you now need to loosen. If the housing cannot open far enough, release the clamp on the hose and carefully remove it.
The replacement itself is very simple: remove the old filter, insert a new one, close the filter box with clips or screws and, if necessary, retighten the hose with a clamp. The same applies here when shopping: Branded products typically perform better and more reliably than untitled air filters.
Change spark plugs
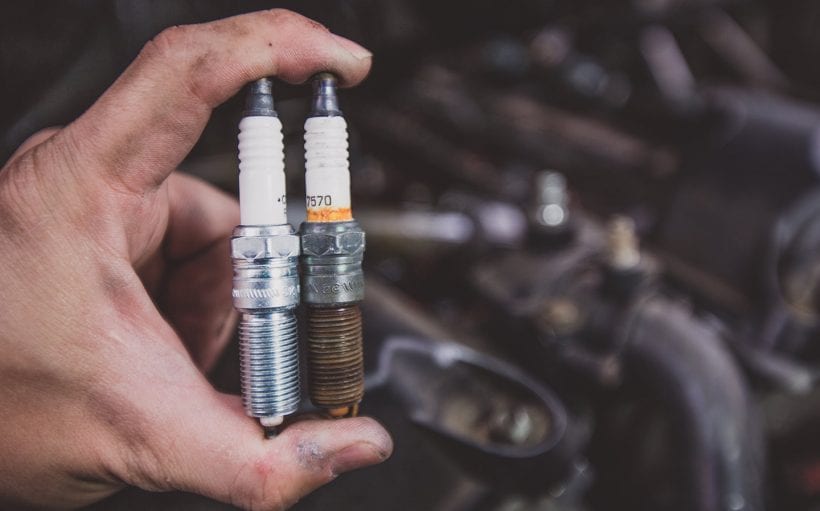
Experienced car mechanics can even change the spark plugs on older cars whose ignition systems are still of classic design. To find them, you have to look for the ignition cables, which in modern cars are usually found under the plastic bonnet. Disconnect the ignition cable from the plug, which may require some force depending on the level of dirt.
You should now pick up the spark plug wrench. Put it on and carefully unscrew the candle when it arrives. After unscrewing it from the thread, it is best to draw the candle with a magnet. Repeat this for each cylinder.
Be careful when placing new candles: Tighten them with your hand, but not too tightly, otherwise, the thread will tear. And note the correct order (as removed) when inserting the ignition cable or the engine will no longer operate properly. Now just – if any – tighten or screw the bonnet back.
Install and remove the radio
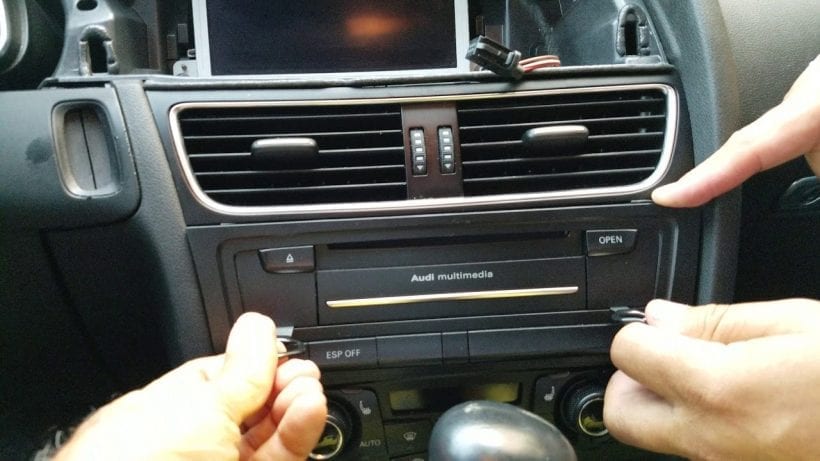
If it is an older car with a retrofitted radio, it can be exchanged relatively easily. Provided you have the right tools at hand.
In most car stations, the display and frame must first be removed. Then snap the clips to the side and pull the device a few inches until you can grasp it comfortably. If the connections (two so-called iso and antenna sockets) are loose then you can easily remove the cable.
In the next step, reconnect the iso plugs, through which the device is powered and connected to the speakers, to the radio. The side-lock cards determine which plug belongs to which socket. Finally, connect the antenna connectors
To make sure it is anchored firmly in the dashboard, you must carefully insert the cables into the slot and slide the radio inside. It becomes a little tricky if the new device does not fit into the existing frame. In this case, remove the old frame from the slot and use the one provided with the device.
Change oil

If the right equipment is available – ideally a well-equipped workshop, and the oil change is done properly, you can save a lot of money here with Do-It-Yourself.
The easiest way to change the oil is when you can stand under the car, ie. Above the workshop pit or with a stable lift platform. Avoid the use of cranes and bogies because, firstly, the car does not rise very much, and secondly, if discounts and the car crash, it can have bad consequences.
First, release the oil drain plug on the oil pan. If the oil is completely drained, close the oil cap with a screw. But do not tighten it too tightly so that the thread does not fall apart and it will reopen next time.
Change the oil filter before refilling the new oil. Make sure the gaskets are completely removed. Lubricate the flange seal with a little fresh engine oil before turning the filter over. Position the new filter straight on the thread so that it does not tilt and attach it firmly to the arm.
Now empty the car or push it down from the pit – of course, without starting the engine – to easily refill with new oil. Charge it into a suitable socket on the engine. The amount you need is in the instruction manual. Allow enough oil to hit the center of the bar between the minimum and maximum mark. Now briefly start the engine until the oil filter is full and top up. To find the best oilfilter, check out solidguides ranked.
Conclusion
The truth is, these things are not difficult and you can do them yourself (judge for yourself) – but only if you complete the individual steps as accurately as possible. For example, if the plug and the oil drain filter are not properly secured, or if too much or too little oil is filled, it can cause serious damage, which in the worst case can damage the engine. Therefore, be well informed before you do anything else on your own.

